
Integrating iyzico Checkout Form into an ASP.NET MVC Project (Step by Step)
I wrote this article because I ran into an issue while developing an e-commerce website using iyzico. At the time, I couldn’t find many resources on integrating iyzico into an ASP.NET MVC project—most explanations pointed only to the official documentation.
The main reference is iyzico’s official documentation, which you can find at dev.iyzipay.com.
Before you can accept real payments, you need to be approved by iyzico. In general, they may expect your website to include items such as:
An “About” page
An SSL certificate
Shipping and return policy
Privacy policy
Distance sales agreement
Visa and Mastercard logos
“Pay with iyzico” badge
In addition, you should integrate the sandbox checkout form on your website and make sure it works end to end.
So how do we integrate the iyzico checkout form into an ASP.NET MVC project? Let’s go step by step.
1) Create a dedicated checkout page
I placed the checkout form on a separate page. On this page, I build the form using invoice and product details passed from the previous page.
2) Render the checkout form in the View
First, we add the JavaScript snippet required to render the checkout form in the View. I do this in the HTTP GET action.
public ActionResult PayProduct(Order order, string email, string isim, string soyisim, string tc, string sehir, string ilce, string adres)
{
/**
Burada siparişin kontolleri vs yapıyorum..
**/
Options options = new Options();
options.ApiKey = "API_KEY";
options.SecretKey = "SECRET_KEY";
options.BaseUrl = "https://sandbox-api.iyzipay.com";
CreateCheckoutFormInitializeRequest request = new CreateCheckoutFormInitializeRequest();
request.Locale = Locale.TR.ToString();
request.ConversationId = order.ConversationId;
request.Price = order.Price.ToString() ;
request.PaidPrice = order.Price.ToString();
request.Currency = Currency.TRY.ToString();
request.BasketId = order.BasketId.ToString();
request.PaymentGroup = PaymentGroup.PRODUCT.ToString();
request.CallbackUrl = "https://domain.com/payment/callback/"+order.ConversationId;
request.Buyer = new Buyer();
request.Buyer.Id = user.Id.ToString();
request.Buyer.Name = isim;
request.Buyer.Surname = soyisim;
request.Buyer.Email = email;
request.Buyer.IdentityNumber = tc;
request.Buyer.RegistrationAddress = adres;
request.Buyer.City = sehir;
request.Buyer.Country = "Türkiye";
request.BillingAddress = new Address
{
ContactName = isim+ " " + soyisim,
City = sehir,
Country = "Türkiye",
Description = adres
};
// Ben her siparişte tek bir olacak şekilde ayarladığım için sepette tek ürün var o da siparişin kendisi.
request.BasketItems = new List<BasketItem>
{
new BasketItem
{
Id = productOrder.Id.ToString(),
Name = order.name,
Category1 = order.category,
ItemType = BasketItemType.VIRTUAL.ToString(),
Price = order.Price+".00", // Sonuna .00 eklemek şart.
},
};
CheckoutFormInitialize checkoutFormInitialize = CheckoutFormInitialize.Create(request, options);
ViewBag.Iyzico = checkoutFormInitialize.CheckoutFormContent;
order.token = checkoutFormInitialize.Token; // Form'a ait token'ı kayıt ederek sonradan ödeme kontrolü yaparken kullancağız.
_educationOrderManager.Update(productOrder);
return View();
}
@{
ViewBag.Title = "Ödeme Yap";
Layout = "~/Views/Shared/_Layout.cshtml";
}
<!-- iyzico'dan gelecek olan JavaScript kodları -->
@Html.Raw(ViewBag.Iyzico)
<div class="container">
<div class="row">
<div class="col col-md-12">
<div class="card">
<div class="card-header">
Ödeme Yap
</div>
<div class="card-body">
<div class="row">
<!-- Ödeme formunu ekrana basıyoruz. -->
<div id="iyzipay-checkout-form" class="responsive"></div>
</div>
</div>
</div>
</div>
</div>
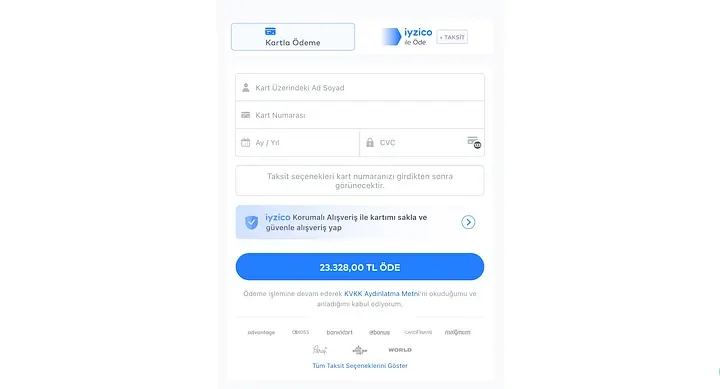
</div>With that GET action and its corresponding View, the checkout form renders like this:
3) Test with sandbox cards
To test payments, you can use the sample test cards below:
5890040000000016 - Akbank Banka Kartı
5526080000000006 - Akbank Kredi Kartı
4) Handle the callback
Next, let’s create a callback endpoint to handle the request iyzico sends after a successful or failed payment. To do that, we create an HTTP GET method.
We send a request to iyzico using the token and conversationId from the initial response. iyzico then returns the payment status (PaymentStatus).
[Route("payment/callback/{id}")]
public ActionResult Callback(string id)
{
    Options options = new Options();
    options.ApiKey = "API_KEY";
    options.SecretKey = "SECRET_KEY";
    options.BaseUrl = "https://sandbox-api.iyzipay.com";

    var order = _orderManager.GetByConversationId(id);

    RetrieveCheckoutFormRequest request = new RetrieveCheckoutFormRequest();
    request.Locale = Locale.TR.ToString();
    request.ConversationId = id;
    request.Token = order.token;

    CheckoutForm checkoutForm = CheckoutForm.Retrieve(request, options);

    if(checkoutForm.PaymentStatus == "SUCCESS")
    {
        return RedirectToAction("Confirm", new { PayGuid = id});
    } else
    {
        return RedirectToAction("Confirm", new { PayGuid = id, fail = "-" });
    }
}
Based on that status, I redirect to a Confirm action with a success/failure flag. On the backend, I also handle things like reducing stock and saving the order to the database.
5) Move from sandbox to production
Start with the sandbox API keys and make sure everything works first. After your account is approved, iyzico provides production keys for real payments. Once you switch to those keys, you can accept payments from your website.
Congratulations! 🎉
If you run into any issues, feel free to message me. Thanks for reading!

Comments